
Introduction
The web3 ecosystem has prioritized back-end development of blockchain-based projects, while providing little to no contribution to the front-end stack.
Frontend is the development of the graphical user interface (UI) of an application. It describes how data is presented and used by the user on the browser; basically, how the app works in general.
In this article we will discuss Web3UI Kitthe first web3 front-end library, and we will also create a dApp dashboard with it and the Moralis React SDK.
Preconditions
This article is project-based and you should have the following before continuing with this tutorial:
What do we build with the Web3UI kit?
We will create a dApp dashboard that displays all NFTs and balance of a logged in user on the Mainnet, Kovan, Rinkeby, Goerli and the Ropsten Testnet.
After completing this tutorial, you will understand how to configure and create a Web3 interface with Web3UI kit components.
How it works
Check out the basic flow of how our dApp dashboard works below:
1. Users will log in by connecting their wallet:

2. Logged in users will be redirected to their dashboard:
Demo
Below you will find a demo video of the dApp dashboard we will create in this tutorial:

You can also check out the live version of what we're building here.
What is the Web3UI kit?

Web3UI Kit is an open source, lightweight, reusable Web3 UI component. It was developed and currently maintained by the Morality team. It's similar to the Web2 UI component library,Chakra UI And Hardware user interfacebut with more features.
Web3UI kit components
The Moralis Web3UI Kit provides an easy-to-use UI component that can accelerate your dApp development.
Below are some of the Web3UI kits we will use to create our web3 dashboard:
1. BannerStrip
The Web3UI interface <BannerStrip /> is a top navigation component that can be used to display an important notice to the user.

2. NFTBalance
The Web3UI interface <NFTBalance /> is a user interface component that retrieves and displays all NFTs belonging to a particular address on a specified blockchain.

3. ConnectButton
The Web3UI interface <ConnectButton /> is an authentication button that allows the user to connect or disconnect their wallet from our dApp. Moralis will handle all the authentication logic under the hood.
4. useNotification
When an event or action takes place in our dApp, the Web3UI useNotification() the hook can be used to issue and display a new notification to the user via the <Notification /> component.
5. Widget
The Web3UI interface <Widget /> The component is a box that can be used to display a dataset label and its value.
6. Todo
The Web3UI kit provides a <Todo /> List UI components with CRUD functionality out of the box. You can implement a working task list in your dApp with just a few lines of code.
7. Hero
The Web3UI kit <Hero> The component can be used to quickly create a hero section for a dApp landing page.

8. Credentials
The Web3UI interface <Credentials /> The component can be used to toggle the visibility of sensitive data on the front end, such as passwords or tokens.

9. Typography
You can improve your dApp font with the Web3UI kit <Typography /> component.
You can view the full list of Web3UI kit components here.
Creating the dApp dashboard
In this section, we will combine all the Web3UI kit components we discussed above to create our web3 dashboard.
Step 1 – Installing Moralis Web3UI Kit in React
Run the command below to create a React application with thread and Create a React app (BOW) :
yarn create react-app my-web3-dashboard
Navigate to the newly created folder with the command below:
cd my-web3-dashboard
Then run the command below to install Moralis React SDK And Web3UI Kit:
yarn add moralis react-moralis web3uikit
Start your React server with the command below:
yarn start
Step 2 – Initializing the Moralis SDK in React
After setting up your Moralis server and installing the Moralis SDK (see here), the next step is to establish a connection between our React application and our Moralis server, via the Moralis SDK.
To create a .env in the root of your project and store your Moralis server details, like this:
REACT_APP_SERVER_URL=https://XXXXXX.usemoralis.com:2053/server
REACT_APP_APP_ID=XXXXXXXXXXXXXXXXXXXXXXXXXXXXXX
Replace the placeholders with your Moralis credentials. Then we need to restart our server after updating the src/.env deposit.
Use the short key below to stop your server:
ctrl + c
Restart your server with:
yarn run start
Then we will update our App.js file with the code below:
import { NotificationProvider } from "web3uikit";
import { MoralisProvider } from "react-moralis";
import { Dashboard } from "./component/Dashboard";

function App() {
  return (
    <MoralisProvider
      serverUrl={process.env.REACT_APP_MORALIS_SERVER_URL}
      appId={process.env.REACT_APP_MORALIS_APP_ID}
    >
      <NotificationProvider>
        <Dashboard />
      </NotificationProvider>
    </MoralisProvider>
  );
}

export default App;
Step 3 – Creating the ConnectButton Component
In this step, we will create the connect wallet component, so that we can connect to the dashboard with our wallet (e.g. Metamask).
In your src case:
- Create a new
componentscase - In the
componentsfolder, create a newConnectWallet.jsxfile with the following code:
import React from "react";
import { ConnectButton, Hero } from "web3uikit";

export const ConnectWallet = () => {
  return (
    <section className='not-connected'>
      <Hero
        backgroundURL='https://moralis.io/wp-content/uploads/2021/06/blue-blob-background-2.svg'
        title='My Web3 Dashboard 🚀'
        height='70vh'
      >
        <ConnectButton signingMessage='Connect wallet' />
      </Hero>
    </section>
  );
};
In the code above we render the <Hero /> and the <ConnectButton /> component.
This is the exit of <ConnectWallet /> component we used above:

Now the user can log in with any of their digital wallets:

The portfolio modal comes from
<ConnectButton />component.
Step 4 – Creating the dApp Dashboard
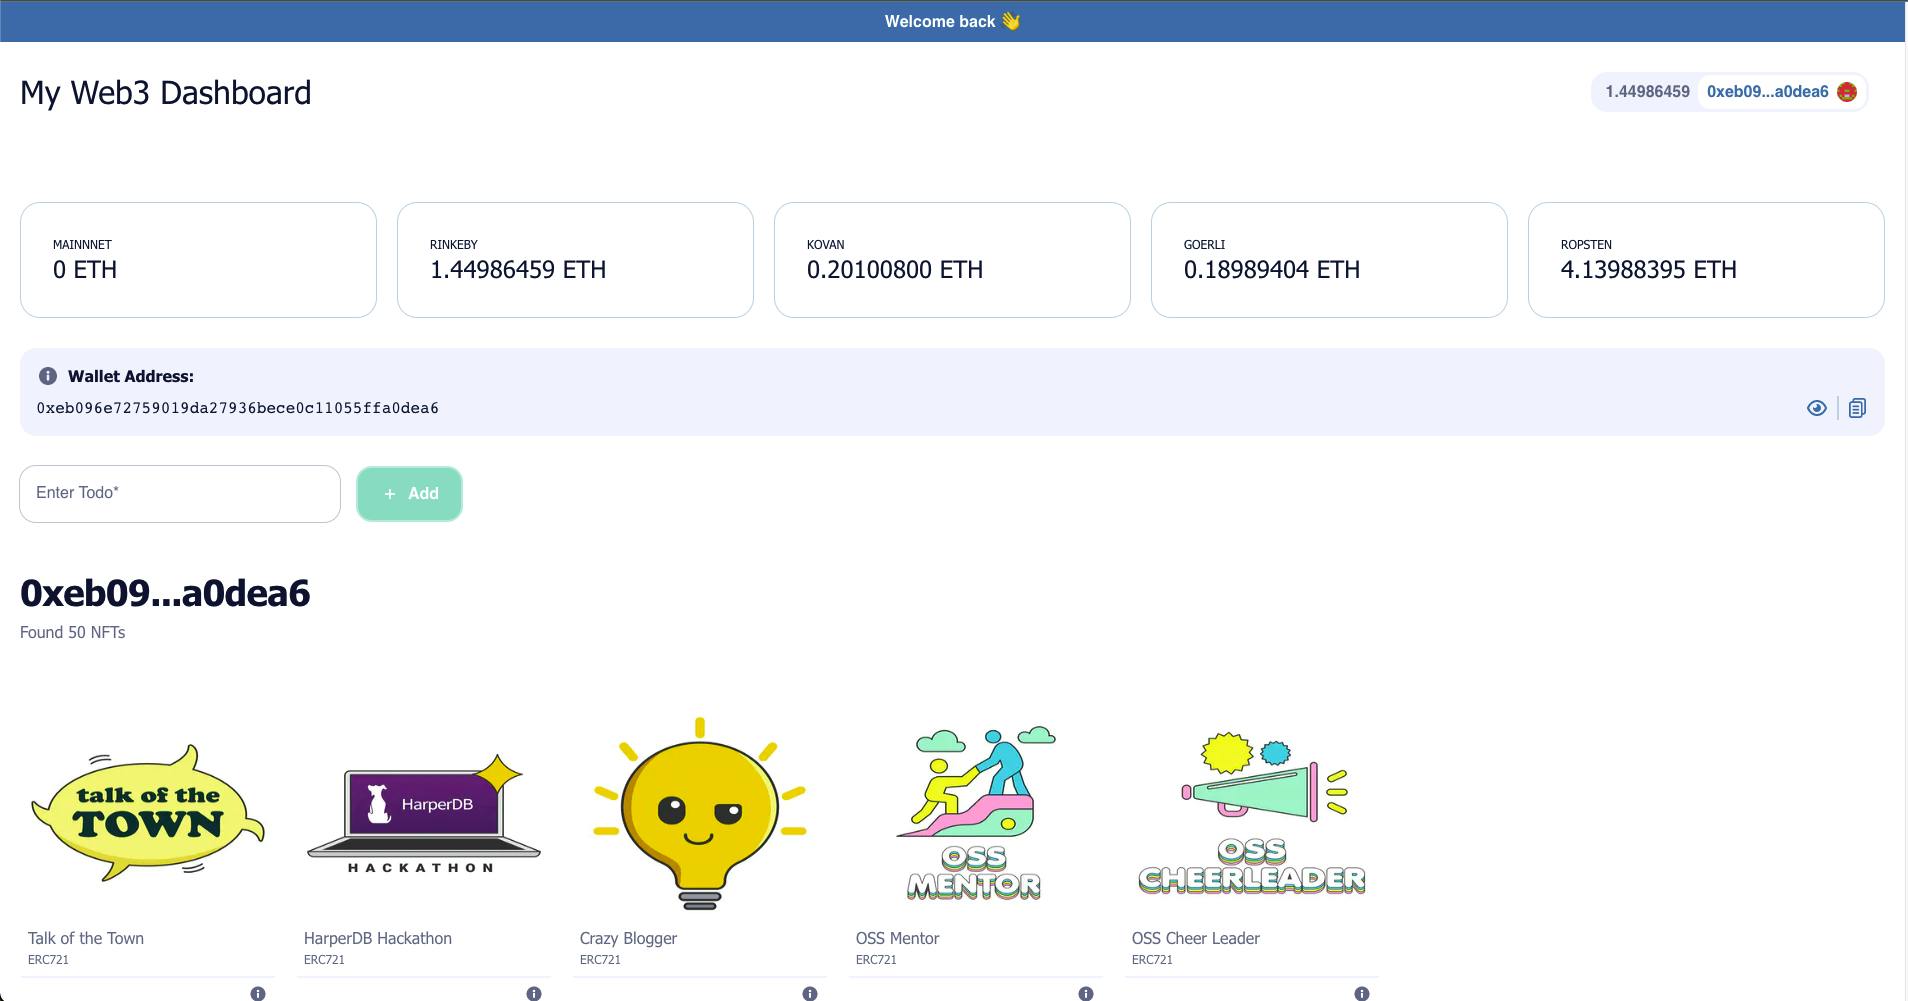
In this step, we will create the dashboard components that will display the following:
The balance of the connected user on the Mainnet, Kovan, Rinkeby, Goerli and Ropsten testnets
A flip card that displays a logged in user's wallet address
A task list to add and remove tasks
NFTs owned by the logged in user
Of your components case:
- Create a new
Dashboard.jsxfile with the code below:
import Moralis from "moralis";
import React, { useEffect } from "react";
import { useMoralis, useMoralisWeb3Api } from "react-moralis";
import {
  BannerStrip,
  NFTBalance,
  ConnectButton,
  useNotification,
  Widget,
  Todo,
  Credentials,
  Typography,
} from "web3uikit";
import { ConnectWallet } from "./ConnectWallet";

export const Dashboard = () => {
  const dispatch = useNotification();
  const Web3Api = useMoralisWeb3Api();
  const { isAuthenticated, user } = useMoralis();

  const userAddress = user?.get("ethAddress");


  const (mainnetBalance, setMainnetBalance) = React.useState("0");
  const (kovanBalance, setKovanBalance) = React.useState("0");
  const (rinkebyBalance, setRinkebyBalance) = React.useState("0");
  const (goerliBalance, setGoerliBalance) = React.useState("0");
  const (ropstenBalance, setRopstenBalance) = React.useState("0");


  const handleNewNotification = ({ type, title, message, position }) => {
    dispatch({
      type: type || "info",
      message: message || "",
      title: title || "New Notification",
      position: position || "topR",
    });
  };


  const fetchTokenBalances = async (chain) => {
    const options = { chain, address: userAddress };
    const result = await Web3Api.account.getNativeBalance(options);
    return result.balance;
  };


  const fetchBalances = async () => {
    const balances = await Promise.all((
      fetchTokenBalances("mainnet"),
      fetchTokenBalances("kovan"),
      fetchTokenBalances("rinkeby"),
      fetchTokenBalances("goerli"),
      fetchTokenBalances("ropsten"),
    ));


    const mainnetBalance = balances(0);
    const kovanBalance = balances(1);
    const rinkebyBalance = balances(2);
    const goerliBalance = balances(3);
    const ropstenBalance = balances(4);


    const mainnetBalanceEther = Moralis.Units.FromWei(mainnetBalance);
    const kovanBalanceEther = Moralis.Units.FromWei(kovanBalance);
    const rinkebyBalanceEther = Moralis.Units.FromWei(rinkebyBalance);
    const goerliBalanceEther = Moralis.Units.FromWei(goerliBalance);
    const ropstenBalanceEther = Moralis.Units.FromWei(ropstenBalance);


    setMainnetBalance(mainnetBalanceEther);
    setKovanBalance(kovanBalanceEther);
    setRinkebyBalance(rinkebyBalanceEther);
    setGoerliBalance(goerliBalanceEther);
    setRopstenBalance(ropstenBalanceEther);
  };

  useEffect(() => {
    if (isAuthenticated) {

      const notificationData = {
        types: "info",
        title: "Wallet Connected 🤝",
        position: "bottomR",
      };


      handleNewNotification(notificationData);


      fetchBalances();
    }
  }, (isAuthenticated));

  return (
    <React.Fragment>
      <header>
        {}
        <BannerStrip
          text={
            isAuthenticated
              ? "Welcome back 👋"
              : "You are not connected to the dApp. Please connect to the dApp to see your NFT balance."
          }
          height='40px'
          className='dapp-header-banner'
        />

        {}
        <section className='container topnav'>
          <Typography variant='h2'>My Web3 Dashboard</Typography>
          <ConnectButton signingMessage='Connect wallet' />
        </section>
      </header>
      <main>
        {isAuthenticated ? (
          <section className='container'>
            {}
            <section className='wallet-balance-widget'>
              <Widget
                title='MAINNNET'
                info={`${mainnetBalance.slice(0, 10)} ETH`}
              />
              <Widget
                title='RINKEBY'
                info={`${rinkebyBalance.slice(0, 10)} ETH`}
              />
              <Widget title='KOVAN' info={`${kovanBalance.slice(0, 10)} ETH`} />
              <Widget
                title='GOERLI'
                info={`${goerliBalance.slice(0, 10)} ETH`}
              />
              <Widget
                title='ROPSTEN'
                info={`${ropstenBalance.slice(0, 10)} ETH`}
              />
            </section>

            {}
            <section className='my-secret-credential'>
              <Credentials
                icon='info'
                text={userAddress}
                title='Wallet Address:'
              />
            </section>

            {}
            <section className='todo-container'>
              <Todo
                label='Enter IP'
                onChange={function noRefCheck() {}}
                todos={()}
              />
            </section>

            {}
            <section className='my-nfts-section'>
              <NFTBalance address={userAddress} chain='rinkeby' />
            </section>
          </section>
        ) : (

          <ConnectWallet />
        )}
      </main>

      <footer className='container'>
        Powered by <a href='https://moralis.io'>Moralis Web3UIKit</a>
      </footer>
    </React.Fragment>
  );
};
In the code above:
- Dashboard content will only be accessible if a wallet is connected.
We check whether a wallet is connected to Moralis or not
isAuthenticatedState.
-
We retrieve the logged in user's balance from all channels using promise.all() and convert it from wei to the ether.
-
We also display all user's NFTs in the
rinkebynetwork.
Replace your index.css stick to the following lines of code:
* {
  padding: 0;
  margin: 0;
  box-sizing: border-box;
}

body {
  font-family: Arial;
}

.container {
  padding: 20px;
}

.not-connected > * > h1 {
  z-index: 0 !important;
}

.topnav {
  display: flex;
  justify-content: space-between;
  align-items: center;
  margin-top: 50px;
  margin-bottom: 20px;
}

.wallet-balance-widget {
  display: flex;
  gap: 20px;
  margin: 30px 0;
}

.todo-container {
  margin: 30px 0;
  width: 100%;
}

.todo-container section {
  padding: 0;
}


.my-nfts-section > section {
  display: flex;
  flex-wrap: wrap;
  justify-content: center;
  align-items: center;
  margin: 30px 0;
}

footer {
  text-align: center;
  margin-top: 50px;
}
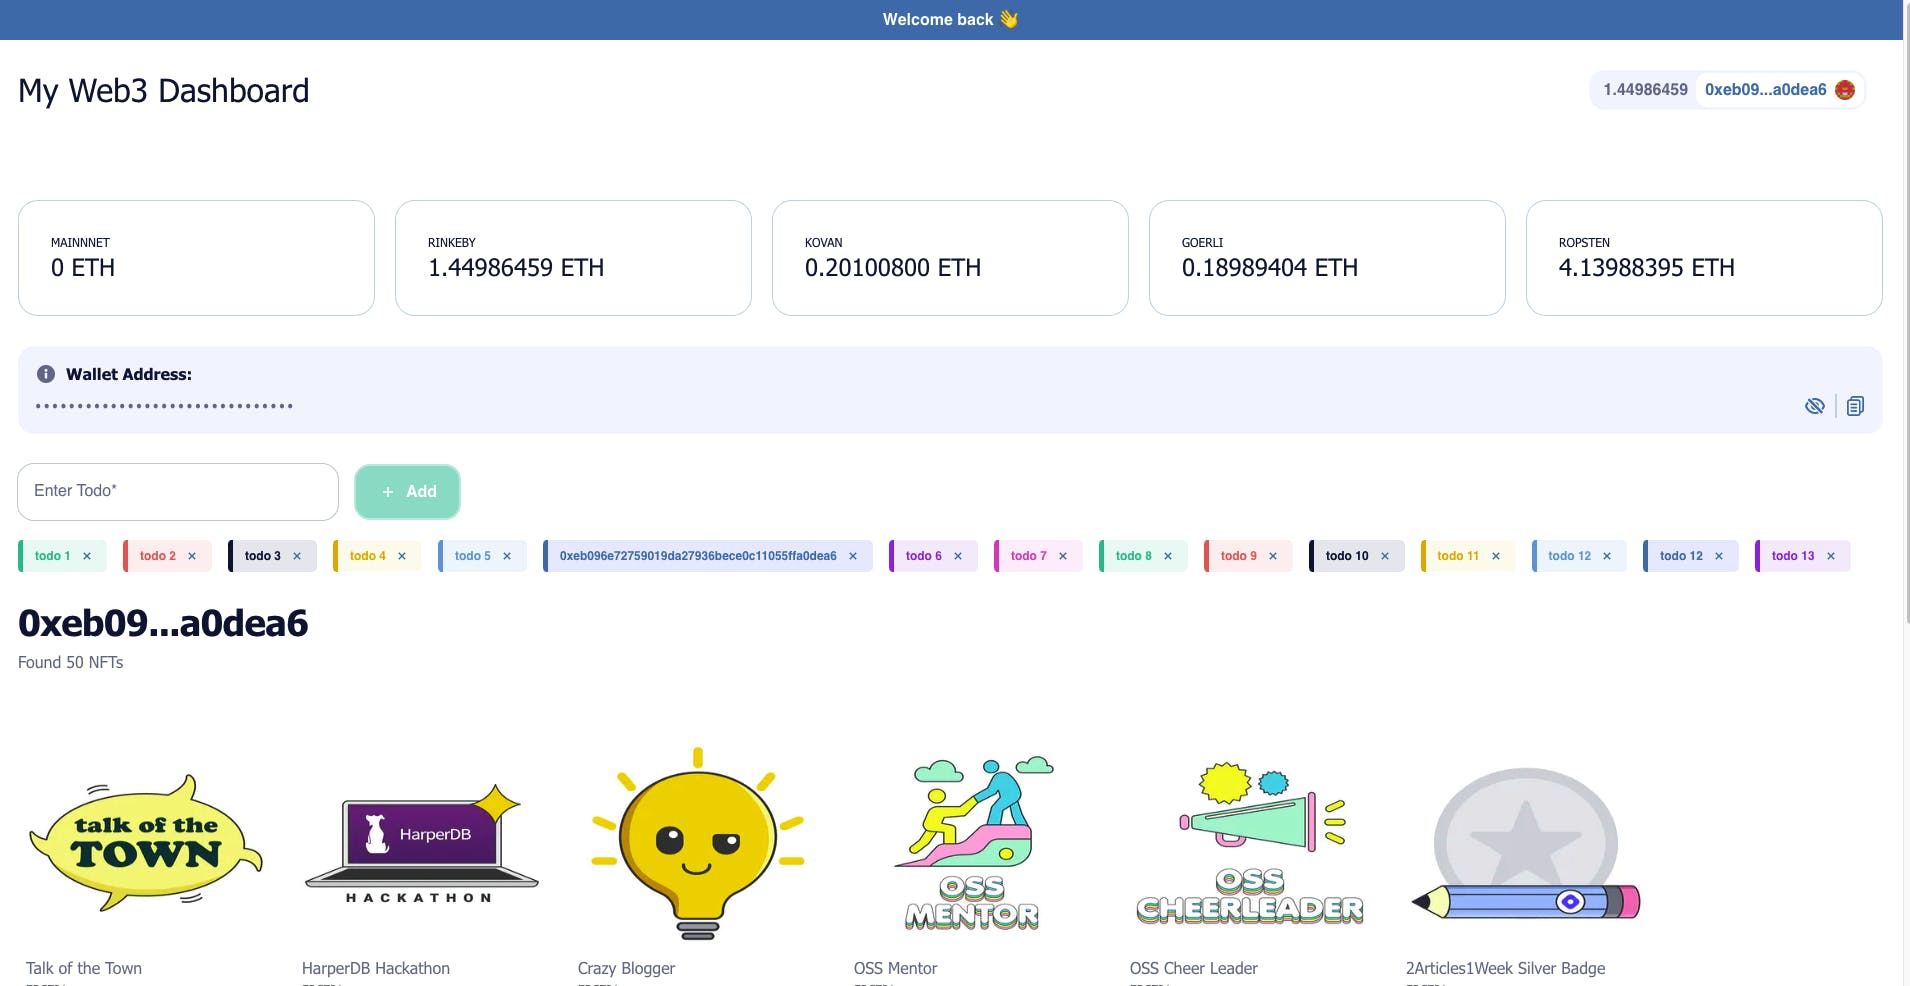
When a wallet is connected, our dApp dashboard should look like this:
You made it 👏
Our dApp dashboard is code ready; you can go ahead and connect your wallet to access the dashboard or track the operation.
You can find the full React source code for our tutorial here.
Conclusion
This article shows how to install and create your dApp interface with Moralis Web3UIKit.
The Web3UIKit is an open source front-end library for creating an interface for Web3 projects and is maintained by Morality. You can contribute to the Web3UI kit from their official repository here.
Where are you going next?
Now that you know how to create an NFT minting smart contract and how to interact with it from a React application:
-
Learn how to create a Web3 connection with the Web3.js library here.
-
Learn how to create your own NFT explorer with the Moralis React SDK here.
-
Learn how to build and deploy an NFT Mining dApp with Solidity and React here.
This article is part of the Hashnode Web3 Blog, where a team of selected editors offers new resources to help you discover the world of web3. Visit us to learn more about NFTs, DAOs, blockchains and the decentralized future.