Custom backend; GCP deployment; Data versioning with GCS integration

Contents
· Introduction
· Preview
∘ Aim
∘ Why semi-automatic?
∘ Enter Label Studio
∘ 1 frontend + 2 backends
· Implementation (local)
∘ 1. Install git and docker and download the backend code
∘ 2. Configure the interface to obtain the access token
∘ 3. Configure backend containers
∘ 4. Connect containers
∘ 5. Happy labeling!
· GCP deployment
∘ 1. Select a project/Create a new project and set up a billing account
∘ 2. Create a VM instance
∘ 3. Configure the VM environment
∘ 4. Follow the previous section and configure everything on the VM
· GCS integration
∘ 1. Configure GCS buckets
∘ 2. Create and configure the service account key
∘ 3. Rebuild backend containers
∘ 4. SDK downloads images from source bucket
∘ 5. Configure target storage
· Acknowledgement
· The references
Creating training data for image segmentation tasks remains a challenge for individuals and small teams. And if you're a student researcher like me, finding a cost-effective method is especially important. In this article I will talk about a solution I used in my Capstone project where a team of 9 people managed to label over 400 images in a week.
Thanks to the Politecnico of Milan Gianfranco Ferré Research Center, we obtained thousands of fashion show images from Gianfranco Ferré's archive database. To explore, manage, enrich and analyze the database, I used image segmentation For smarter cataloging and finer searching. Image segmentation of runway photos also lays the foundation for creating informative text descriptions for better search engine and text-to-image generative AI approaches. Therefore, this blog will detail:
- how to create your own backend with label studioin addition to the existing segment anything in backendfor semi-automatic image segmentation labeling,
- how to host on Google Cloud Platform for group collaboration, and
- How to use Google Cloud Storage buckets for data versioning.
The code for this article can be found in this GitHub repository.
Aim
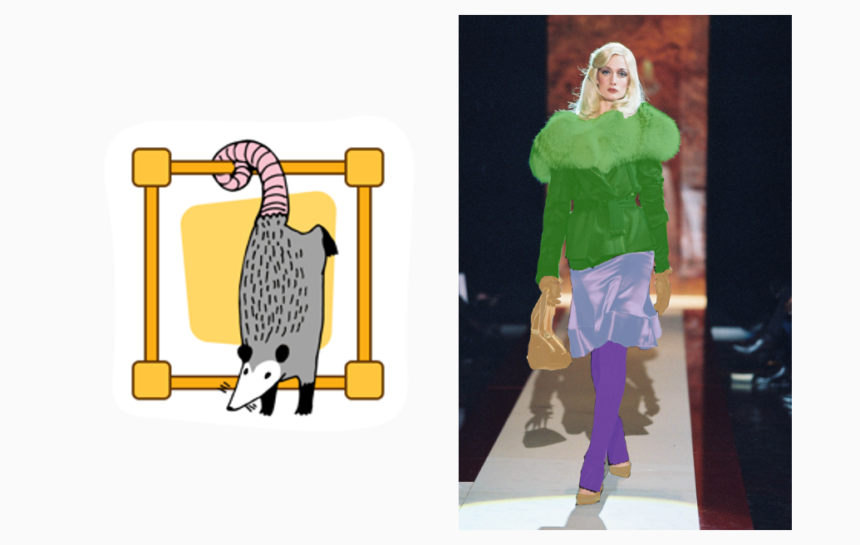
Segment and identify the names and typologies of fashion garments in the runway images, as shown in the first image.
Why semi-automatic?
Wouldn't it be great if a trained segmentation model could perfectly recognize every item of clothing in the runway images? Unfortunately, there isn't one. There are trained models suitable for fashion or clothing images, but nothing can match our dataset perfectly. Every fashion designer has their own style and preferences for certain clothes, as well as their color and texture. So even if a segmentation model can be 60% accurate, we consider that a win. Then, we still need humans in the loop to correct errors in the segmentation model.
Enter Label Studio
Label Studio provides an open source, customizable and free community version for different types of data labeling. One can create their own backend, so I can connect the Label Studio interface to the backend of the trained segmentation model (mentioned above) so that labelers can further improve automatic predictions. In addition, Label Studio already has an interface that looks a bit like Photoshop and a series of segmentation tools that can be useful to us:
- Brush and eraser
- Magic wand for selecting pixels of similar color
- Segment anything backend that leverages the power of SAM by Meta and allows you to recognize the object within a bounding box that you draw.
1 frontend + 2 backends
So far we want 2 backends to be connected to the frontend. One backend can perform the segmentation prediction and the second can speed up changing the labelers if the predictions are wrong.

Now let's launch the application locally. In other words, you'll be able to use the app on your laptop or local computer completely free, but you won't yet be able to invite your labeling team to collaborate on their laptops. We'll talk about teamwork with GCP in the next section.
1. Install git and docker and download the backend code
If you do not have git Or docker on your laptop or local computer, please install them. (Note: you can technically bypass the git install step if you download the zip file from this GitHub repository. If you do, ignore the following.)
Then open your terminal and clone this deposit to a directory of your choice.
git clone https://github.com/AlisonYao/label-studio-customized-ml-backend.git
If you open the label-studio-customized-ml-backend folder in your code editor, you can see that the majority are adapted from Back-end Label Studio ML repo, but this directory also contains the frontend template code and adapted SDK code from Studio Label SDK.
2. Configure the interface to obtain the access token
Following official guidelines from segment anythingdo the following in your terminal:
cd label-studio-customized-ml-backend/label_studio_ml/examples/segment_anything_modeldocker run -it -p 8080:8080 \
-v $(pwd)/mydata:/label-studio/data \
--env LABEL_STUDIO_LOCAL_FILES_SERVING_ENABLED=true \
--env LABEL_STUDIO_LOCAL_FILES_DOCUMENT_ROOT=/label-studio/data/images \
heartexlabs/label-studio:latest
Next, open your browser and type http://0.0.0.0:8080/ and you will see the Label Studio interface. Proceed to register with your email address. Now there is no project yet, so we need to create our first project by clicking Create a project. Create a name and description (optional) for your project.

Download some images locally. (We'll talk about how to use cloud storage later.)

For labeling configuration, click Custom model on the left and copy and paste the HTML code of label-studio-customized-ml-backend/label_studio_frontend/view.html deposit. You don't need all four header lines if you don't want to display image metadata in the labeling interface. Feel free to modify the code here as needed or click Visual to add or remove labels.

Now click To safeguard and your labeling interface should be ready.

At the top right, click on the user settings icon and click Account Setting and you should then be able to copy your access token.

3. Configure backend containers
In the label-studio-customized-ml-backend directory, there are many backends thanks to the Label Studio developers. We will use the custom ./segmentation backend for segmentation prediction (container 1) and ./label_studio_ml/examples/segment_anything_model for faster labeling (container 2). The first will use port 7070 and the second will use port 9090, making it easy to distinguish from the 8080 front port.
Now paste your access token in the 2 docker-compose.yml files in ./segmentationAnd ./label_studio_ml/examples/segment_anything_model Files.
environment:
- LABEL_STUDIO_ACCESS_TOKEN=6dca0beafd235521cd9f23d855e223720889f4e1
Open a new terminal and you enter the segment_anything_model directory as you did before. Next, launch the segment any container.
cd label-studio-customized-ml-backend/label_studio_ml/examples/segment_anything_modeldocker build . -t sam:latest
docker compose up
Then open another new Terminal CD in the segmentation directory and launch the segmentation prediction container.
cd label-studio-customized-ml-backend/segmentationdocker build . -t seg:latest
docker compose up
As of now, we have successfully started all 3 containers and you can check again.

4. Connect containers
Before, what we were doing with the access token was already helping us connect containers, so we're almost done. Now go to the frontend that you started some time ago and click Settings in the upper right corner. Click on Machine learning left and click Add a template.

Make sure to use the URL with port 9090 and enable interactive preannotation. Complete the addition by clicking Validate and save.
Likewise, do the same with the segmentation prediction backend.

Then I like to activate Retrieve predictions when autoloading a task. This way, every time we refresh the labeling page, the segmentation predictions will be automatically triggered and loaded.

5. Happy labeling!
Here's a demo of what you should see if you follow the steps above.
If we're not happy with the predictions of, say, the skirt, we can remove the skirt and use purple magic (segment anything) to quickly label it.
I'm sure you can figure out how to use the brush, eraser and magic wand for yourself!